Master the Art of Screen Capture: Your Definitive Guide on How to Take a Screenshot on Windows
In today's digital landscape, the ability to effectively take a screenshot on Windows is not just a convenience—it's a fundamental skill for productivity, communication, and problem-solving. Whether you're a seasoned professional creating detailed documentation, a student capturing lecture slides, or a casual user wanting to share a funny moment, mastering Windows screen capture techniques is essential. This comprehensive guide, crafted by SEO experts, will demystify the various methods available, ensuring you can grab any desktop snapshot with precision and ease. Dive in to unlock powerful Windows screenshot capabilities and elevate your digital proficiency.
Essential Methods for Capturing Your Windows Screen
Windows offers a rich array of built-in tools and keyboard shortcuts to help you capture your screen. Understanding each method empowers you to choose the most efficient approach for any given situation, from a quick screen grab to a meticulously cropped image. We'll explore the most popular and effective ways to perform a screen capture on Windows.
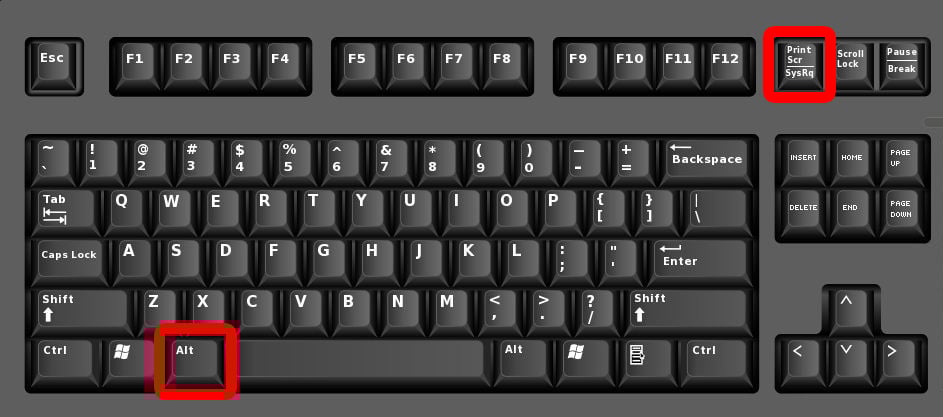
Method 1: The Classic Print Screen (PrtScn) Key
The Print Screen key (often labeled "PrtScn," "PrntScrn," or "Print Sc") is the most iconic and perhaps the quickest way to capture your entire screen. Located typically in the upper-right section of your keyboard, it's a go-to for many users.
How to Use the Print Screen Key:
- Full-Screen Screenshot to Clipboard: Simply press the PrtScn key. This action copies an image of your entire screen to your clipboard. To use it, you'll need to paste it into an image editor (like Paint, Photoshop, or even Microsoft Word) by pressing Ctrl + V.
- Full-Screen Screenshot to File: Press Windows key + PrtScn. Your screen will briefly dim, indicating a successful capture. The screenshot is automatically saved as a PNG file in your "Pictures" folder, inside a subfolder named "Screenshots." This is incredibly convenient for quick saving.
- Active Window Screenshot: Press Alt + PrtScn. This captures only the currently active window (the one you are working in) to your clipboard. Again, you'll need to paste it into an application to save or edit it. This is perfect for isolating specific application windows without capturing the entire desktop clutter.
Expert Tip: While the Print Screen key is fast, remember it doesn't offer any editing capabilities directly. For more refined captures or immediate annotation, you'll want to explore other tools.
Method 2: The Versatile Snipping Tool (Windows 7/8/10 Legacy)
The Snipping Tool has been a staple in Windows for years, offering more flexibility than the basic Print Screen key. It allows you to select specific areas of your screen, making it ideal for capturing precise content.
Steps to Use the Snipping Tool:
- Launch the Tool: Search for "Snipping Tool" in the Windows search bar and open it.
- Select a Snipping Mode: Click "New" or the "Mode" button. You'll see several options:
- Free-form Snip: Draw any shape around an object.
- Rectangular Snip: Drag the cursor to form a rectangle. This is the most commonly used mode.
- Window Snip: Select a window you want to capture.
- Full-screen Snip: Captures the entire screen, similar to PrtScn.
- Capture Your Screen: Once you've selected a mode, your screen will "grey out." Click and drag (for free-form or rectangular) or click on the desired window/screen to capture.
- Edit and Save: The captured image will appear in the Snipping Tool window. Here, you can use basic annotation tools like a pen, highlighter, or eraser. You can then save the image capture as a PNG, JPEG, GIF, or MHT file, or copy it to your clipboard.
The Snipping Tool offers a great balance between speed and functionality, making it a powerful utility for precise screen grabs.
Method 3: The Modern Snip & Sketch (Windows 10/11)
Snip & Sketch is the successor to the Snipping Tool, offering a more modern interface and enhanced annotation features. It's designed to streamline the screen capture and editing process, especially for touch-enabled devices, but works perfectly with a mouse and keyboard.
How to Use Snip & Sketch:
- Quick Launch Shortcut: The fastest way to activate Snip & Sketch is by pressing Windows key + Shift + S. This immediately brings up a small toolbar at the top of your screen.
- Select Capture Type: On the toolbar, choose from:
- Rectangular Snip: Drag to select a rectangular area.
- Free-form Snip: Draw a custom shape.
- Window Snip: Click on a specific window to capture it.
- Full-screen Snip: Capture your entire display.
- Capture and Edit: Once you make your selection, the captured image is automatically copied to your clipboard. A notification will also appear in the bottom-right corner. Click this notification to open the image in the Snip & Sketch app.
- Advanced Editing Features: Inside the Snip & Sketch app, you can:
- Crop the image.
- Draw with various pens and highlighters.
- Use a ruler or protractor for precise markings.
- Touch write.
- Share directly to other apps or print.
- Save the desktop snapshot as a PNG, JPG, or GIF.
Snip & Sketch is arguably the most versatile built-in tool for taking and immediately annotating screenshots on Windows 10 and Windows 11, making it a favorite for many users seeking efficient digital documentation.
Method 4: Capturing with the Xbox Game Bar (Gaming & More)
While primarily designed for gamers, the Xbox Game Bar (Game Bar) offers a robust screen capture feature that can be used for any application or desktop activity. It's particularly useful for capturing videos in addition to still images.
Steps to Use the Game Bar:
- Activate Game Bar: Press Windows key + G to open the Game Bar overlay.
- Locate Capture Widget: Look for the "Capture" widget. If you don't see it, click on the Widget Menu icon (three horizontal lines) and select "Capture."
- Take a Screenshot: Within the Capture widget, click the camera icon to take a screenshot. Alternatively, use the default keyboard shortcut Windows key + Alt + PrtScn while the Game Bar is active (or even without it being open, if the feature is enabled).
- Access Your Captures: All screenshots taken with the Game Bar are automatically saved as PNG files in your "Videos" folder, inside a subfolder named "Captures." You can also click "See all my captures" within the Game Bar to view them directly.
The Game Bar is an excellent option for users who frequently need to capture both still images and video recordings, offering a unified interface for multimedia captures.
Advanced Tips and Productivity Hacks for Screenshots
Beyond the basic methods, there are several ways to optimize your screen capture workflow and make the most out of your captured images. These productivity tips can significantly enhance your efficiency.
Organizing Your Screenshots
- Dedicated Folder: While Windows automatically saves screenshots to the "Screenshots" folder, consider creating a more organized system for project-specific captures.
- Naming Conventions: Adopt a consistent naming convention (e.g., "ProjectX-FeatureY-Date.png") for easier retrieval.
- Cloud Sync: Utilize cloud storage services (OneDrive, Dropbox, Google Drive) to automatically sync your screenshot folder, ensuring backup and accessibility across devices.
Basic Editing and Annotation
After you take a screenshot on Windows, you often need to highlight specific areas or add notes. Both Snipping Tool and Snip & Sketch offer built-in annotation features:
- Highlight Key Information: Use the highlighter tool to draw attention to important text or elements.
- Add Arrows and Text: Use the pen tool to draw arrows or circles, and for more advanced needs, paste the screenshot into Paint or a more robust image editor like Paint.NET or GIMP to add text overlays.
- Cropping for Focus: Remove unnecessary distractions by cropping your screenshot to focus on the most relevant content. This is crucial for clear communication and professional-looking documentation.
Actionable Advice: For professional use, especially when creating tutorials or bug reports, always crop and annotate your screenshots. This clarity saves time and prevents misinterpretations. Consider external tools if built-in options aren't enough.
Leveraging Third-Party Screenshot Tools
While Windows' built-in tools are powerful, many third-party applications offer even more advanced features, such as scrolling captures, delayed captures, advanced annotation, OCR (Optical Character Recognition), and direct cloud uploads. Popular options include:
- Greenshot: Lightweight, open-source, and highly customizable with excellent annotation and export options.
- ShareX: A feature-rich tool for advanced users, offering extensive capture methods, powerful workflows, and numerous upload destinations.
- LightShot: Simple, fast, and integrates well with online sharing.
These tools can significantly enhance your digital imaging capabilities if your needs extend beyond basic captures.
Troubleshooting Common Screenshot Issues
Even with straightforward processes, users occasionally encounter hiccups. Here are some common issues and their quick fixes:
- Print Screen Not Working:
- Ensure the PrtScn key isn't disabled by a function lock (Fn key) on laptops. Try Fn + PrtScn.
- Check if a third-party application (like OneDrive or Dropbox) has taken over the PrtScn shortcut. You might need to adjust their settings.
- Screenshots Not Saving:
- Verify that the "Screenshots" folder exists in your "Pictures" directory. If not, create it.
- Check disk space. Full drives can prevent files from being saved.
- Ensure you have write permissions for the target folder.
- Black Screen or Blank Screenshots:
- This often happens with protected content (e.g., streaming services, DRM-protected videos). Some applications actively block screen capture.
- For gaming, ensure your graphics drivers are up to date.
Understanding these potential issues can save you time and frustration when you need a quick screenshot.
Frequently Asked Questions
What is the easiest way to take a screenshot on Windows 10/11?
The easiest and most versatile way to take a screenshot on Windows 10 or Windows 11 is by using the Windows key + Shift + S shortcut. This immediately activates the Snip & Sketch tool, allowing you to select a rectangular area, free-form shape, a specific window, or the entire screen. The captured image is then copied to your clipboard, and a notification appears, letting you click to open it directly in the Snip & Sketch app for immediate editing and saving. This method is highly recommended for its flexibility and integrated editing capabilities, streamlining your screen capture workflow.
Where do screenshots go on Windows?
The destination of your screenshots on Windows depends on the method used. If you press Windows key + PrtScn, the screenshot is automatically saved as a PNG file in your "Pictures" folder, within a subfolder specifically named "Screenshots." If you use the Snipping Tool or Snip & Sketch, the image is initially copied to your clipboard. You then have the option to save it to any location on your computer through the tool's interface (File > Save As...). Screenshots taken with the Xbox Game Bar are typically saved in your "Videos" folder, inside a "Captures" subfolder. Always check these default locations first if you're looking for a recently captured image file.
Can I take a scrolling screenshot on Windows without extra software?
Unfortunately, no. Windows' built-in screen capture tools like Print Screen, Snipping Tool, and Snip & Sketch do not natively support taking a scrolling screenshot (capturing content that extends beyond the visible screen, such as an entire webpage). For this advanced functionality, you will need to rely on third-party software. Popular browser extensions like "GoFullPage" for Chrome/Edge or dedicated applications like ShareX or PicPick offer this capability, allowing you to capture long web pages or documents that require scrolling to view in their entirety. These tools are invaluable for comprehensive digital documentation.
How do I edit a screenshot after taking it?
After you take a screenshot on Windows, you have several options for editing. If you used Snip & Sketch (Windows key + Shift + S), clicking the notification after capture opens the image directly in the Snip & Sketch app, where you can crop, draw with pens/highlighters, and use a ruler. If you used the Snipping Tool, the captured image appears in its window, offering similar basic annotation tools. For screenshots taken with PrtScn (which go to the clipboard), you can paste them into a basic image editor like Microsoft Paint (Windows key + type "Paint" and press Enter, then Ctrl + V) or a more advanced program like Paint.NET, GIMP, or Adobe Photoshop for more comprehensive editing, including adding text, shapes, and applying filters. The choice of editor depends on the complexity of the edits required for your desktop snapshot.
0 Komentar